Breaking down one scene into five quality game writing resources, ranging from screenplay templates to excel spreadsheets, for you to freely download.

In this digital age of endless content, locating free resources should be a breeze, but for narrative designers and game writers, this hunt can prove to be extremely challenging. When you're starting out in the industry, it often seems like there are a million unwritten rules about how to format scenes, structure dialogue, and organise narratives; you have no idea where to begin!
Perfecting your craft requires practice, and practice becomes significantly easier when there's a template to kickstart your writing. So, this article takes one scene and breaks it down into different structures with a variety of tools, letting you explore and download each one for free!
Excel Spreadsheet
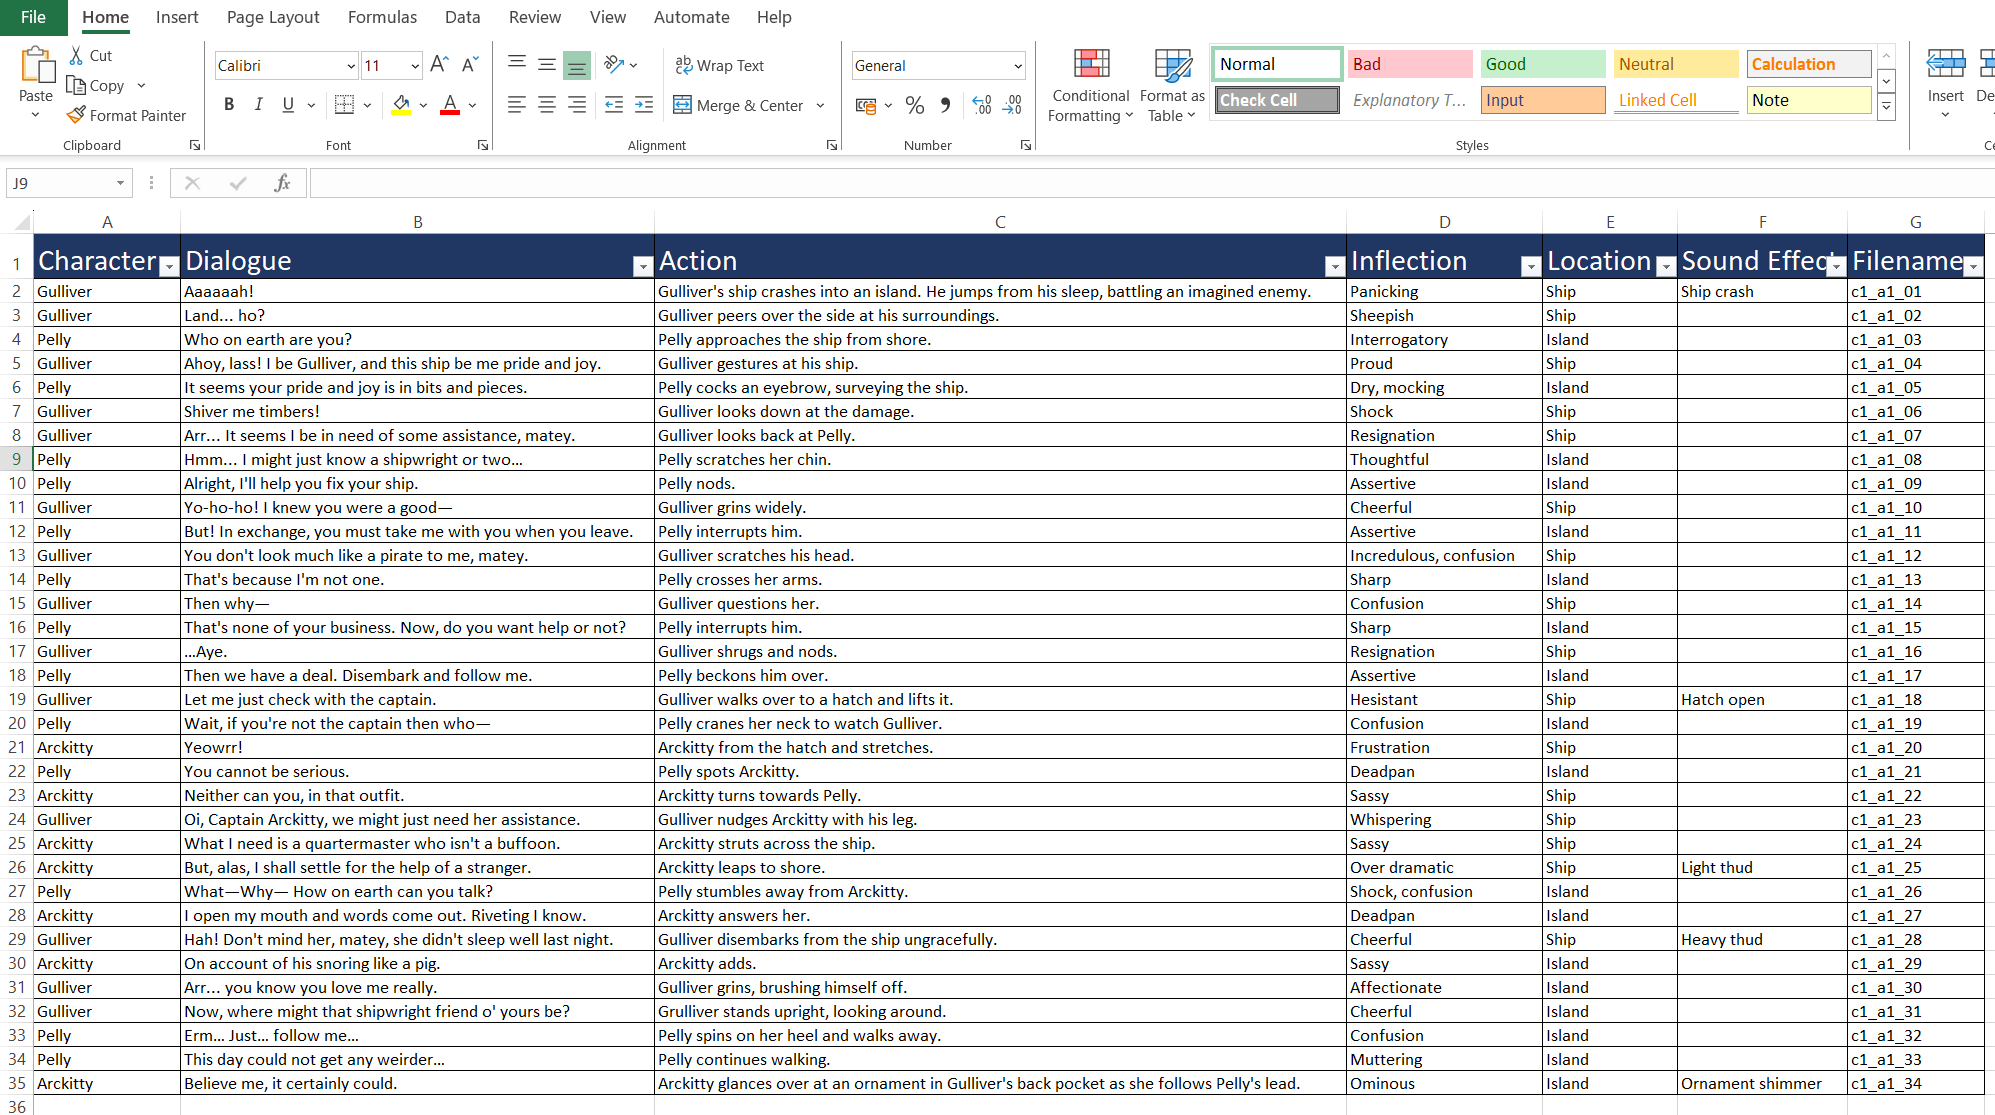
The first resource is a dialogue spreadsheet made with Microsoft Excel, a (perhaps surprisingly) commonly used tool amongst game writers and dialogue designers. This tool is fantastic for effortlessly organising dialogue in a way that is clear and easily understood by a wide range of team members, including voice actors, developers, and sound designers. Let's dive into this spreadsheet and clarify the purpose of each section.

- Character: This is the name of the person speaking. Ensure consistency in your naming conventions (e.g. first name only, first and second name, nicknames, etc.). Otherwise, if you filter the excel sheet to only display lines spoken by Gulliver, for example, some of his lines may be missing.
- Dialogue: This contains the dialogue or voice line. Generally in game development, there will be a limit as to the maximum characters that can be displayed at once, so practice breaking dialogue down into shorter lines.
- Action: This section outlines the scene's actions - detailing the character's movements, reactions, and interactions with others. Keep it concise and succinct - only include the minimum information needed for the scene to be understood.
- Inflection: This dictates the way the character says their line, giving essential direction to the voice actors and demonstrating the personality of your characters. This is particularly useful for sarcastic or playful characters whose dialogue might otherwise easily misconstrued.
- Location: This details where the character is standing. Depending on the size and complexity of your project or game, you may also want to have sublocations or area codes to offer further clarity.
- Sound effect: This includes any sound effects that play during the scene, providing helpful cues for voice actors and sound directors.
- Filename: This is the name of the file containing the recorded voice line. As various designers and developers will likely refer back to this spreadsheet when implementing the dialogue into the game, it's important to keep these files neatly organised. You can easily achieve this by establishing a standardised naming convention—in this example, I've opted for c1 (chapter 1), a1 (act 1), 01 (voice line).
Final Draft Screenplay
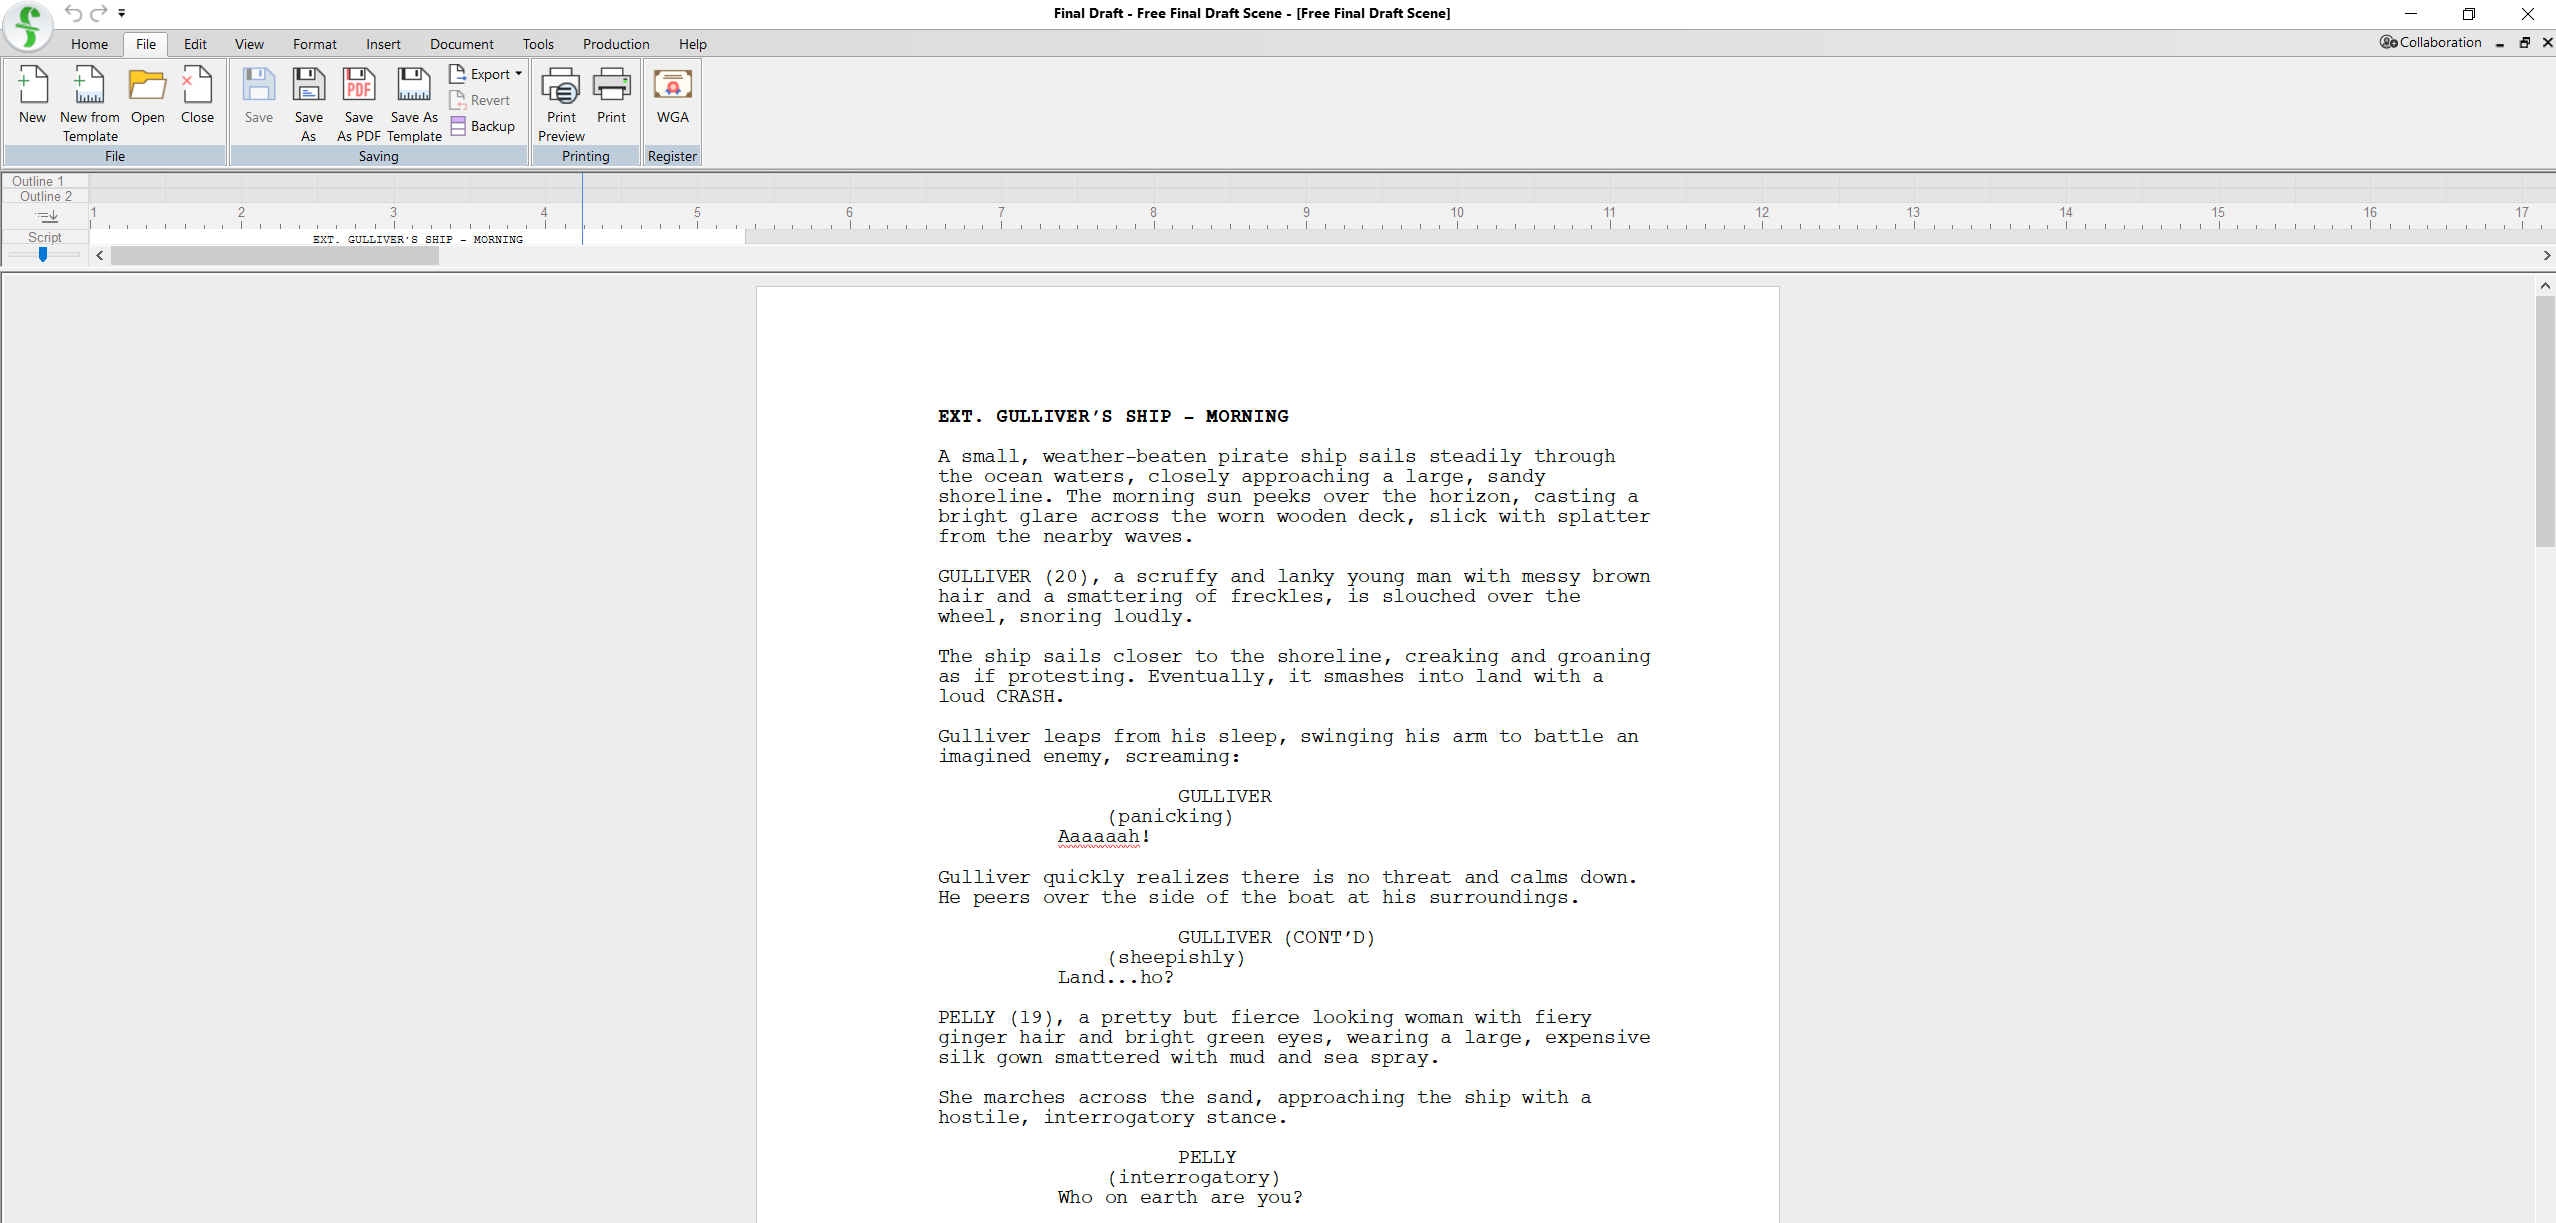
Final Draft is a staple of screenwriting and game writing, commonly used by writers to design scripts, trailers, cutscenes, and linear dialogue. This tool is great for quickly creating and exporting screenplays to the standardised, professional format without having to fiddle around with margins and indents. However, it's less useful for complex, branching dialogue and player choice.
Final Draft also comes at a pretty hefty cost, so it's not always viable for writers, especially those who are starting out. Therefore, if it's out of your price range, skip to the next section of the article for a free version. Otherwise, keep on reading for a step-by-step guide to writing in a screenplay format.
- Scene heading: This describes when and where the scene is taking place. Firstly, you clarify whether the location is outside (EXT.) or inside (INT.), following by the specific location and time of day (usually DAY or NIGHT, but also MORNING, EVENING, LATER, etc.).
- Scene descriptions: This section details what can be seen and heard within the scene, encompassing character descriptions, object details, scene depictions, and action sequences.
- Speaker: This is the name or nickname of the person speaking, which should be kept the same throughout the screenplay in order to ensure coherence and consistency. This line can also be used to indicate whether a character speaking off-screen (O.S.), in a voice-over (V.O.).
- Dialogue: Pretty self-explanatory—this section contains the spoken dialogue.
- Parenthetical: Similar to inflection, parentheticals are used to dictate how the speaker delivers their line—their emotions, their volume, their direction, etc.
Screenwriting Alternatives
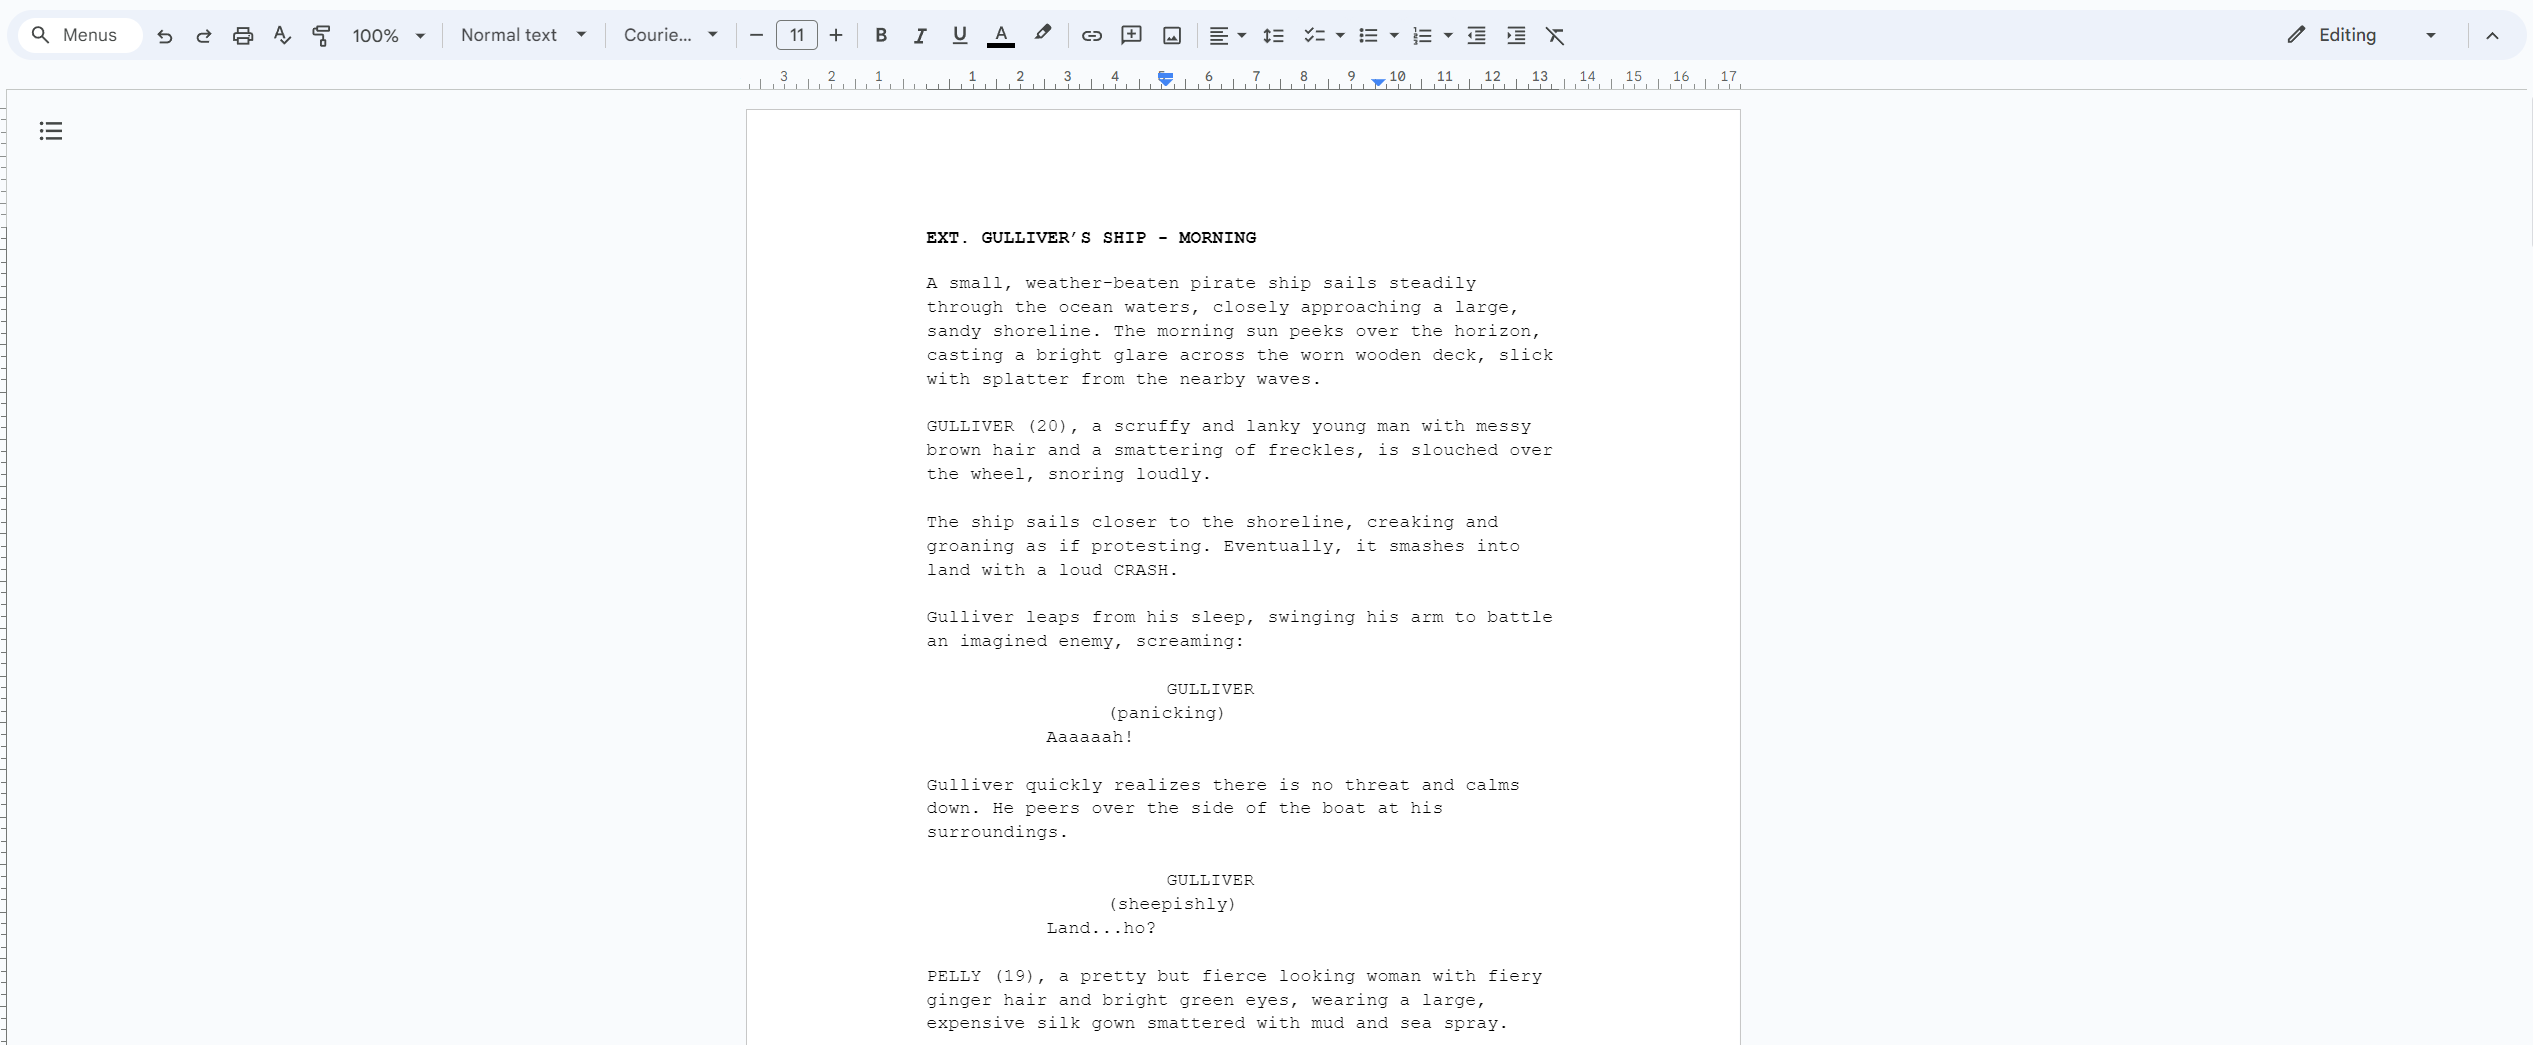
If Final Draft is out of your price range, then have no fear! There are a ton of fantastic alternatives for writers with a limited budget such as WriterDuet and Fade In Pro. Or, if you are interested in more familiar alternatives, we have recreated our scene in Google Docs and Microsoft Word.
While it is a bit more hassle to get the formatting and structure exactly correct in these pieces of software, they are still a great way to practice writing in the screenplay style. Also, using our sample scenes as reference makes the whole process a lot easier. As both of these scenes use the same screenplay format as Final Draft, we'll skip the format breakdown.
 Google Docs: Using the Screenplay Formatter extension, making screenplays in Google Docs is relatively easy. It might not be perfect, and the dialogue might format a little strangely when it runs over multiple pages; however, it does a great job at giving you a place to start.
 Microsoft Word: Microsoft Word can be pretty finicky when trying to write in a screenplay format, however a lot of people are more familiar with the software. It also allows you to write offline with ease, which might be a plus for some writers.
Arcweave
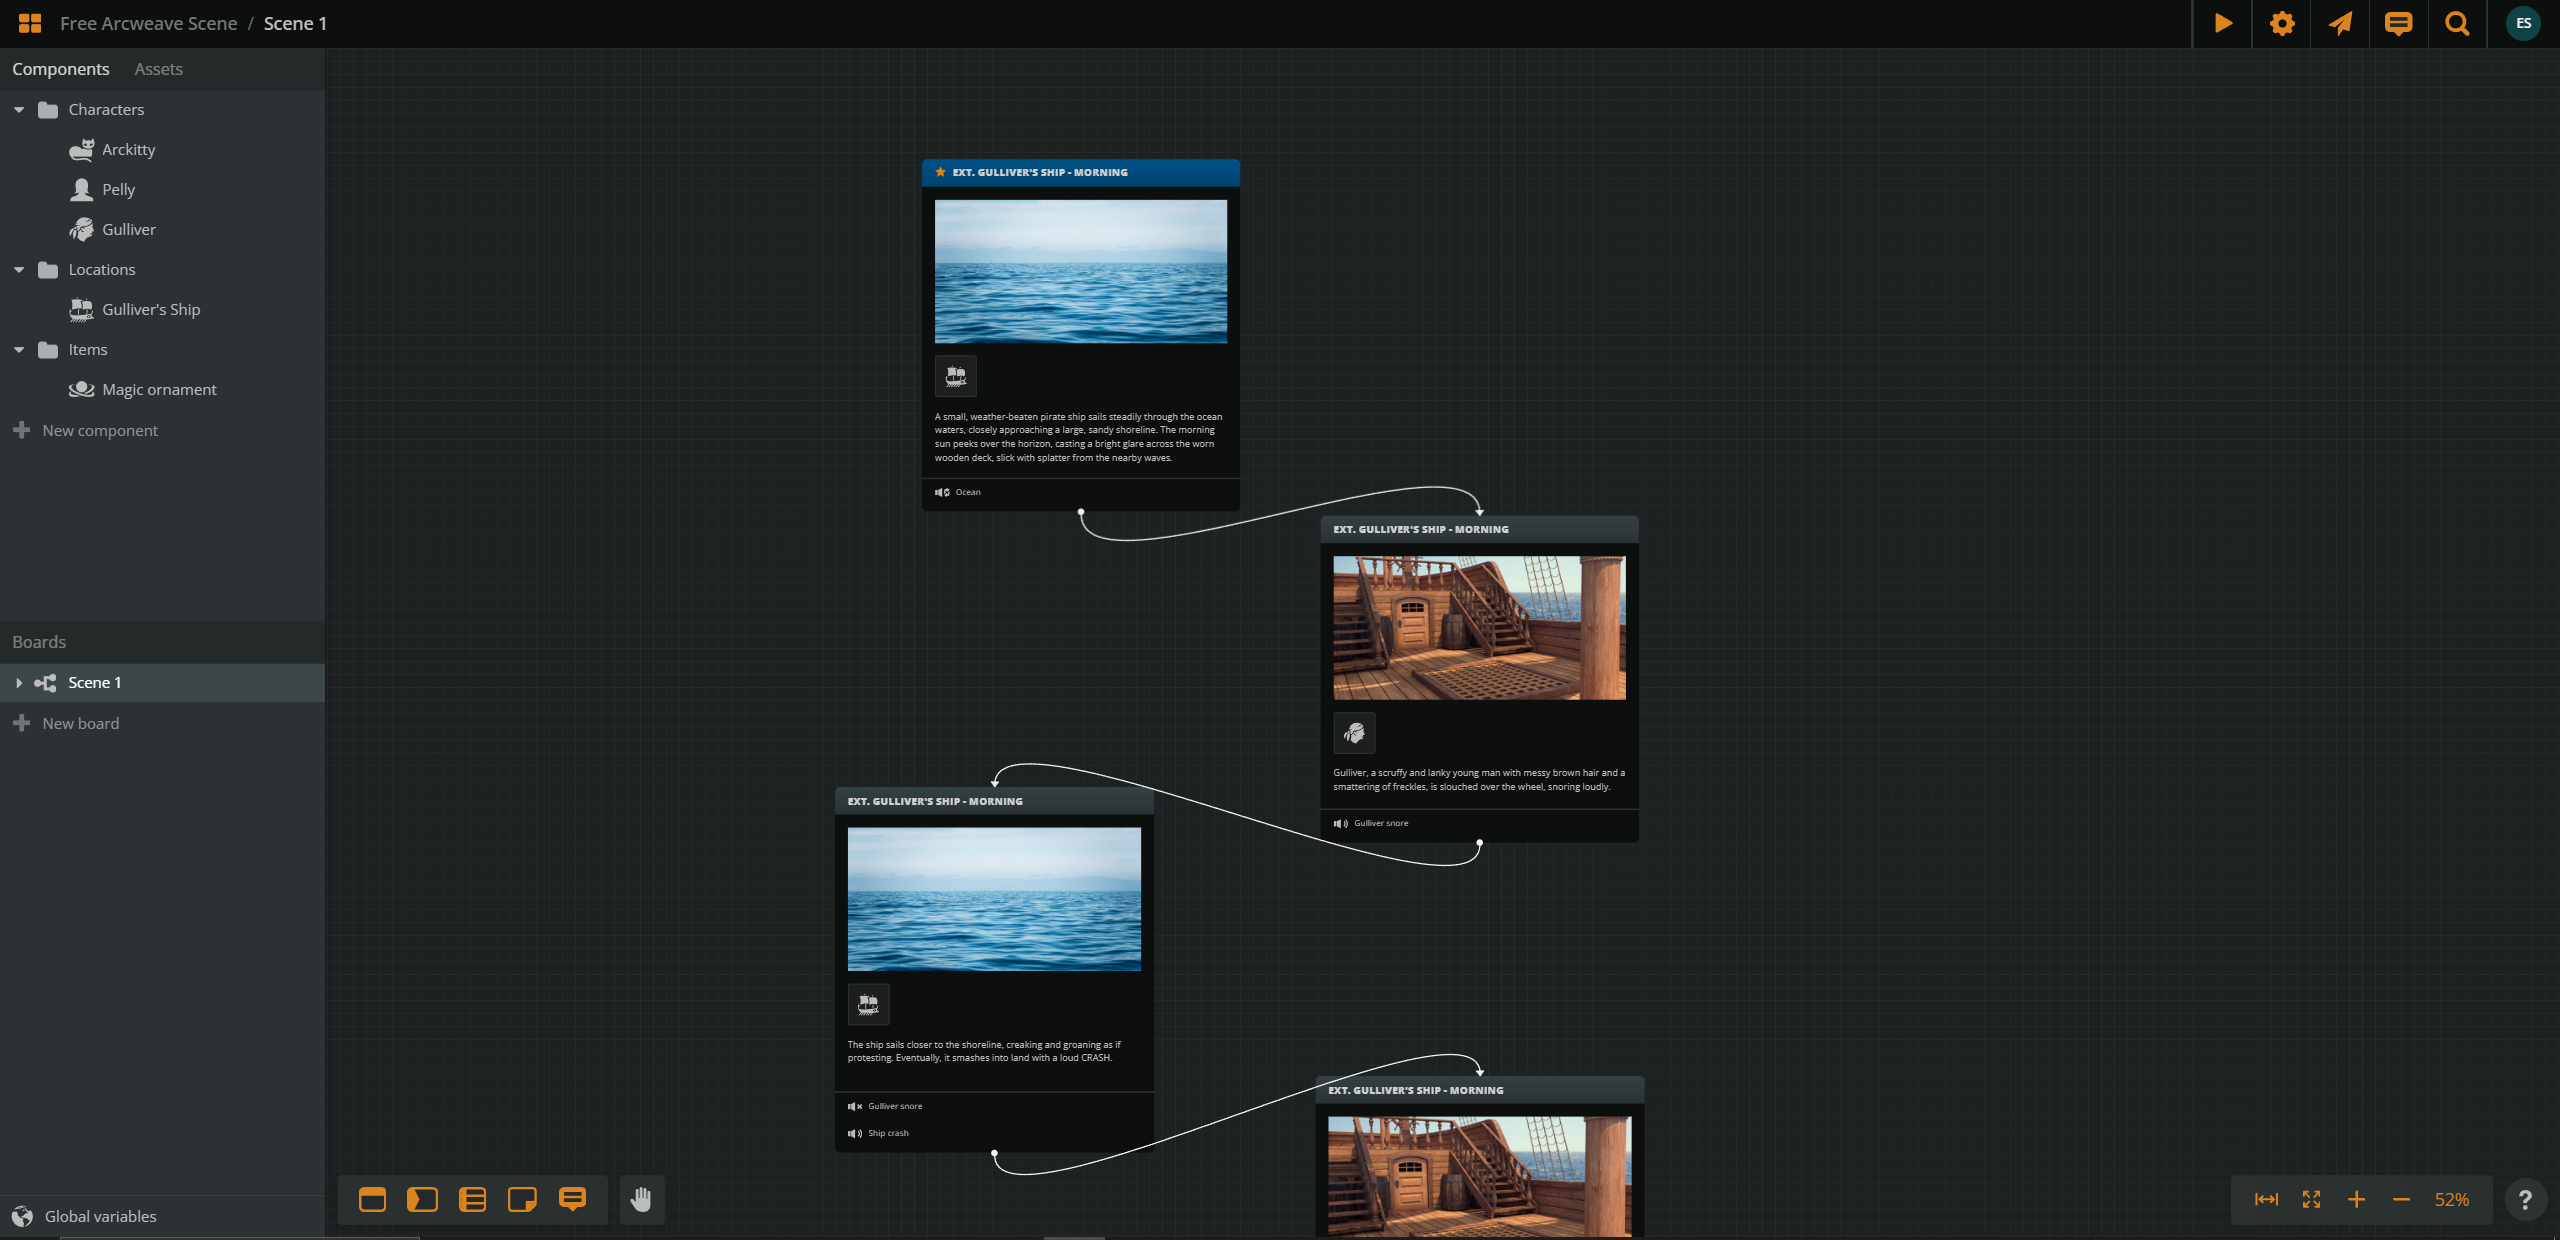
Finally, if you prefer an audiovisual approach to crafting a scene, or if you prefer to write as a team, then Arcweave may just be the solution for you. Our web-based narrative design software allows you to plan, script, share, and direct your scenes on any device connected to the internet. Collaborate with other editors in real-time and share your project either in full or as a playable link. The best part? You can try it out for free!
Arcweave is an incredibly dynamic piece of software utilised by narrative designers, writers, developers, programmers, and creatives of all kinds — so, while this article looks at how to use Arcweave to write a linear scene, it's really just the tip of the iceberg. From interactive stories to engine-integrated games, Arcweave offers a comprehensive solution to all things narrative. For now, however, let's break down this project and examine how to write and design a scene in Arcweave.
- Boards: This refers to the narrative diagram which contains all of your project's content. For our writing sample, we only have one scene—meaning we are only using one board, but you can use multiple boards to represent different scenes or events, building up your subplots into a fully-fledged story.
- Components: These are blocks of information which contain your characters, locations, objects, and other key items in your scene. Simply drag and drop components into their respective scenes and check their references to get a list of all the scenes and instances they are mentioned in.
- Assets: These are images and audio files that you can use in your scene. Add cover art to demonstrate where each scene takes place and bring your components to life. Use audio to build your ambience and implement recorded voicelines or sound effects directly into each scene.
- Folders: These allow you to neatly organise your boards, components, and assets into various categories, keeping your scene clean and navigable.
- Elements: These contain each line of action or dialogue, including a title and enclosed content which supports rich text formatting.
- Connections: These are the arrows which connect various elements together. In a linear story, like this sample scene, there is only one arrow connecting each element. However, in a branching story, you can use multiple connections to create player choices.
- Notes & Comments: Communicate with your co-writers and editors in real-time and share your thoughts, corrections, or alternate line pitches with notes and comments.
Start writing!
Now that you've had a chance to check out these resources, go ahead and grab them to kickstart your writing journey. Take inspiration from each sample scene to ignite your creativity and feel free to tweak things as you see fit. With a bit of practice, game writing will start to feel like second nature, so don't hesitate to jump right in and start honing those skills.
If you find these writing resources helpful and are thinking of using them in your project, feel free to share your work with us on our Discord or other social media platforms. Our showcase is brimming with users crafting amazing creations with our software, and you're more than welcome to join them! We're always here to support our community members and look forward to creating more resources in the future.