Remix Arcweave Visual Novel template with CSS
You don't need to know CSS to make your Arcweave game look like yours. Start from the Visual Novel template, paste one small recipe at the bottom of the Style Editor, and see the change right away. Each recipe takes 2 to 5 minutes.
⚠️ This guide works only with the Visual Novel template. The recipes change the CSS of the Visual Novel Example project template, so they need that CSS to be in your Style Editor. They won't give the same result on a project with Play Mode's default look, or on a layout you built from scratch.
- Starting from Play Mode's default look? Follow How to customize your Arcweave game using CSS.
- Want to build the visual novel layout yourself, step by step? Follow How to create a visual novel style in Arcweave's Play Mode. The template uses almost the same CSS.
Here we take the shortcut: keep the template's layout, change its look.
Key takeaways
- Add your changes below one line at the end of the template's CSS, and never edit what's above it (except @import lines, see Recipe 2).
- Change colors, fonts and option buttons by overriding the template's
--vn-variables. - Use connection colors, visited options and text formatting to give your story's choices and words a meaning.
Before we start
Ingredients
- An Arcweave project created from the Visual Novel Example template, or one where you pasted that template's CSS.
- Owner or editor access to the project: only they can use the Style Editor.
Accessing the Style Editor
- Open your project and click Play Mode (▶️) in the top bar. Play Mode opens in a new tab.
- Click the Style Editor icon (palette) in Play Mode's top bar. If the bar has faded, move your pointer to the top of the window.
- The Style Editor opens on the right, already filled with the template's CSS.
💡 Drag the left edge of the panel to make it wider.
Back up the CSS
Click inside the editor, select everything (Ctrl/Cmd+A), copy it and paste it into a text file called my-style-backup.txt. If anything goes wrong, you paste this back and you're safe.
Make room for your changes
Scroll to the very end of the CSS and paste this line:
/* ===== MY CHANGES: everything below this line is mine ===== */
The golden rule: add, don't edit
Every recipe in this guide goes below that line. You never touch the CSS above it.
Why this works: when two rules style the same thing, the one lower in the file wins. So you don't need to understand the template. You write your rule at the bottom, and it replaces the template's choice. Broke something? Delete your last paste.
CSS in 60 seconds
This is all the CSS you need to read the recipes:
.prototype__body {          /* WHO: a part of the screen */
  border-radius: 4px;       /* WHAT: property: value; */
}
- The name that starts with a dot is a part of the screen (a selector). In Arcweave they start with
prototype__, with two underscores. Each one is explained in How to customize your Arcweave game using CSS and listed in the Styling reference. - Inside the curly braces, each line is property: value;. Don't forget the semicolon at the end.
- Text between
/*and*/is a note for humans. CSS ignores it. - Colors are written as codes like
#f2c14e. Search "color picker" in your browser to find the code of any color. - The preview changes live as you type, but only in your tab. Click Save changes so your teammates and players see it.
⚠️ If Save changes is disabled, there's a syntax error. Click the error count at the bottom of the panel to see which line.
Anatomy of the Visual Novel template
Every recipe starts with the name of a part of the screen. This map shows which name goes with which part.
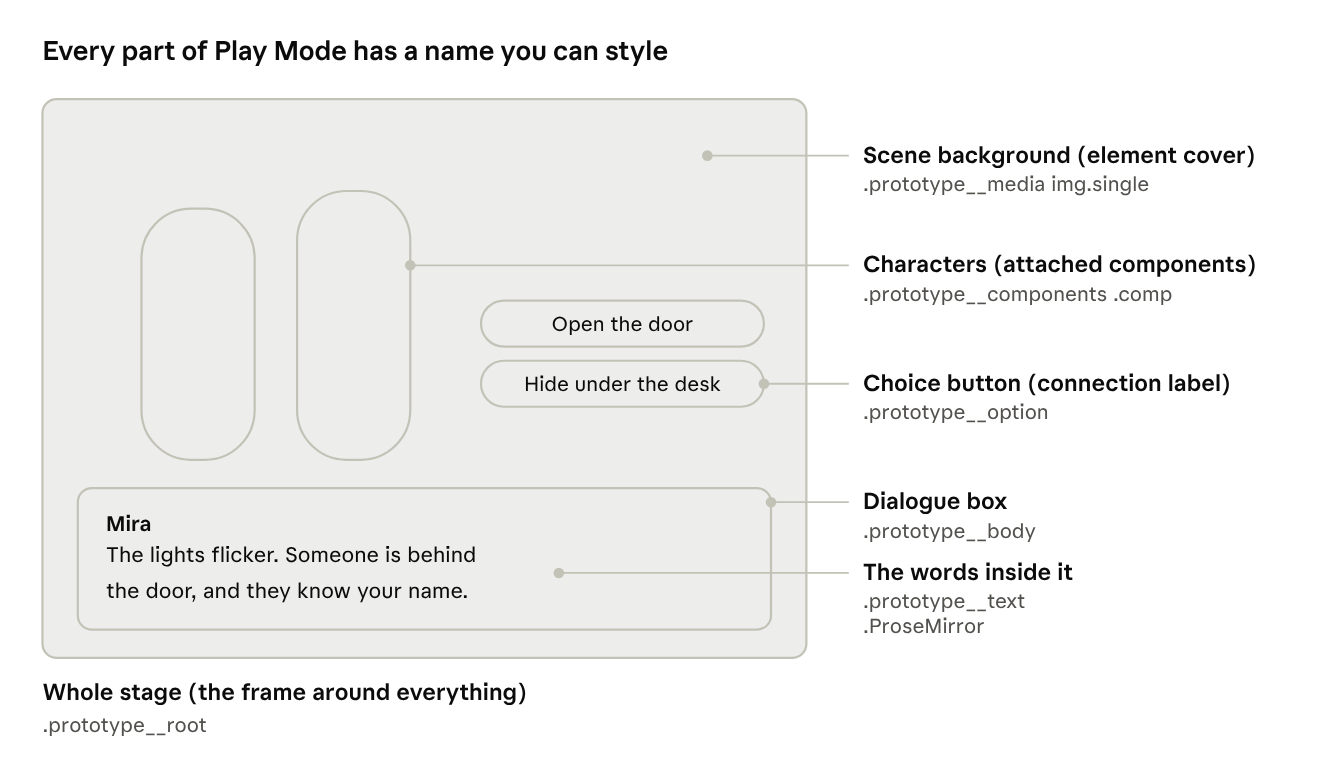
In the template, the element cover fills the whole stage as the background, components with a cover image stand in the middle as characters, and the option buttons sit above the dialogue box. Exact positions change with screen size. To see how each part was built, read How to create a visual novel style in Arcweave's Play Mode.
Recipes 1 to 3: colors, font and option buttons
These three alone make your game look different from every other game. Do them in order.
Recipe 1: Your colors
You get: your own dialogue box, text and option colors.
The template keeps its colors in a small palette near the top of the CSS: a block that starts with :root and lines that start with --vn-. These are CSS variables, explained in How to create a visual novel style in Arcweave's Play Mode. You don't need to find them: paste your own palette below MY CHANGES and it wins.
Pick three colors before you start: a dark one for boxes, a light one for text, and an accent for borders. Then paste this:
/* Recipe 1: my colors */
:root {
  --vn-dialogue-bg: #1d1a2b;
  --vn-dialogue-border: #f2c14e;
  --vn-dialogue-text: #f4ecd8;
  --vn-option-bg: #2b2540;
  --vn-option-border: #f2c14e;
  --vn-option-text: #f4ecd8;
  --vn-option-hover-bg: #3d3460;
  --vn-option-hover-border: #ffffff;
}
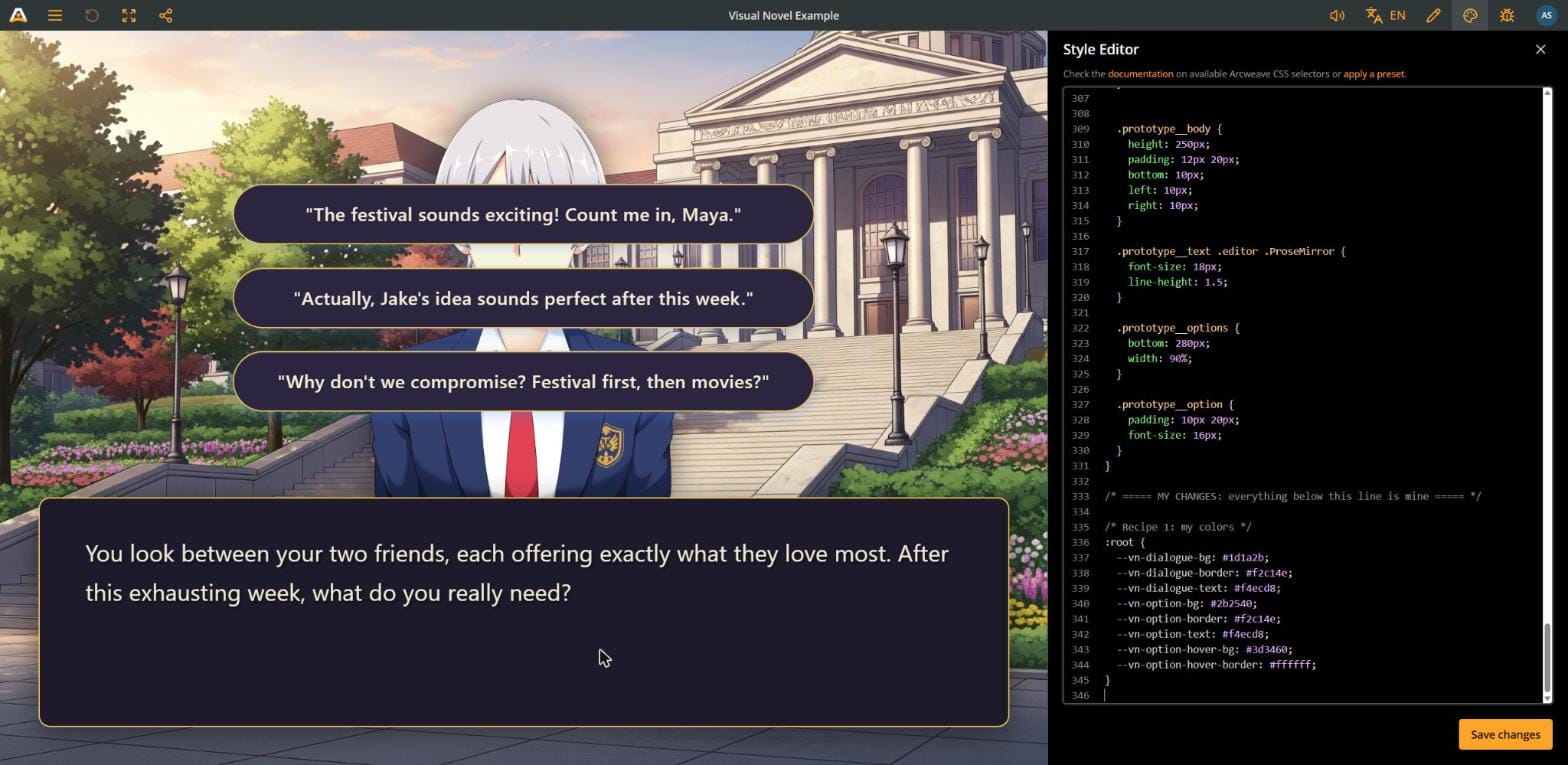
Make it yours: dialogue is the box at the bottom, option is the option buttons, hover is a button under the pointer. Replace the color codes with your three colors.
💡 Keep text and background far apart in brightness. A free contrast checker (search "WebAIM contrast checker") tells you if the text is readable; aim for at least 4.5:1.
Recipe 2: Your font
You get: a font that sets the mood before anyone reads a word.
- Go to Google Fonts and pick a font. Some ideas: Special Elite (typewriter, noir), Cinzel (fantasy titles), Caveat (handwriting), Press Start 2P (retro pixel, use it small).
- Click Get font, then Get embed code, and choose the @import option. Copy only the line that starts with
@import. - Paste that line on line 1 of the CSS, above everything else. This is the only exception to the golden rule: an
@importline is ignored anywhere else. - Then paste this at the bottom, with your font's name:
/* Recipe 2: my font (the @import line is on line 1) */
.prototype__text .editor .ProseMirror,
.prototype__option {
  font-family: 'Special Elite', monospace;
}
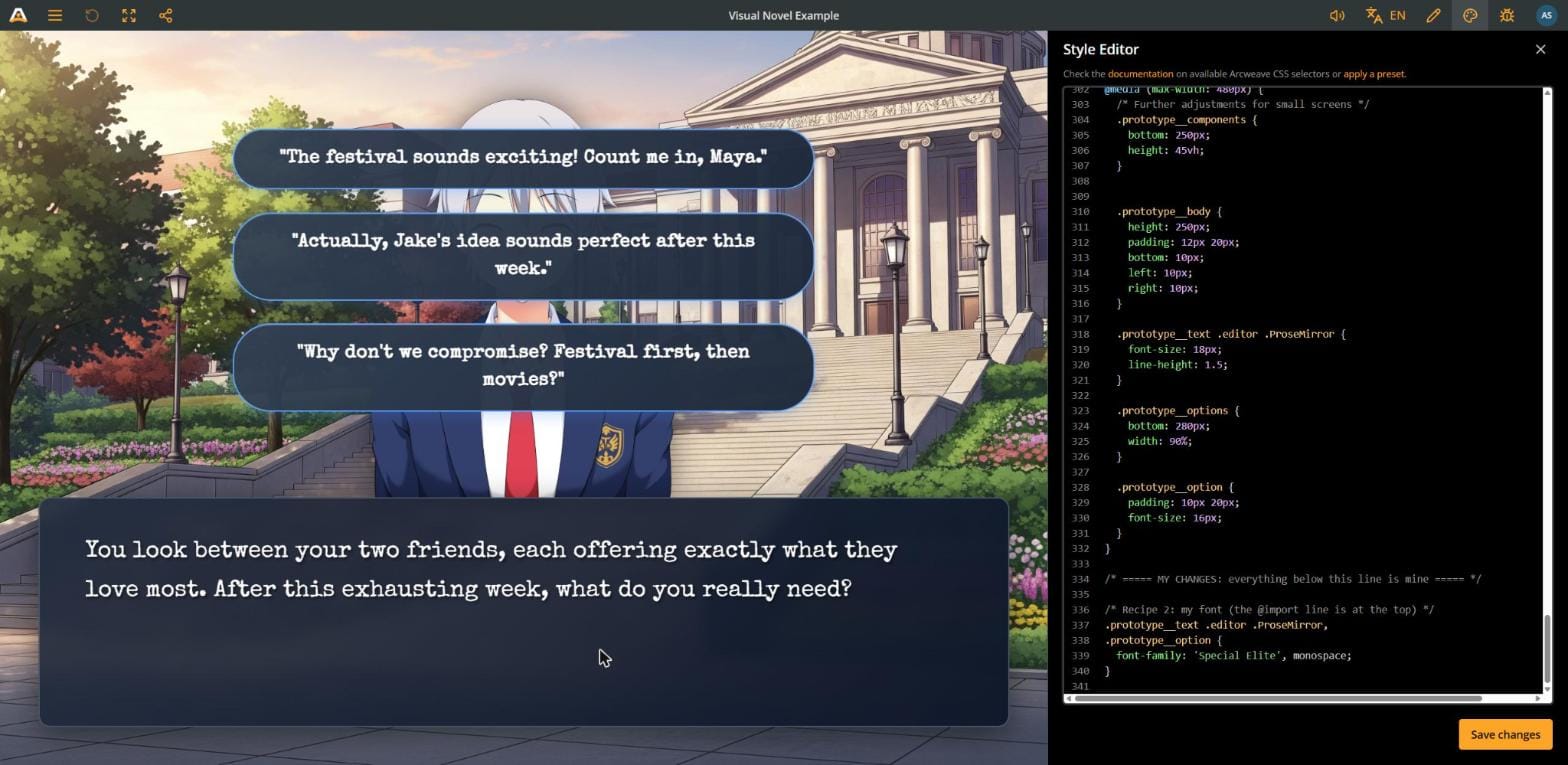
Make it yours: the name between quotes must match the font name exactly, spaces and capitals included. The word after the comma is a backup used while the font loads: serif, sans-serif, monospace or cursive.
Recipe 3: Your option buttons
You get: square buttons with an arrow, that slide right under the pointer. The option button and its hover state are explained in How to customize your Arcweave game using CSS.
/* Recipe 3: my option buttons */
.prototype__option {
  border-radius: 4px;
  text-align: left;
}
.prototype__option p::after {
  content: " →";
}
.prototype__option:hover {
  transform: translateX(8px);
}
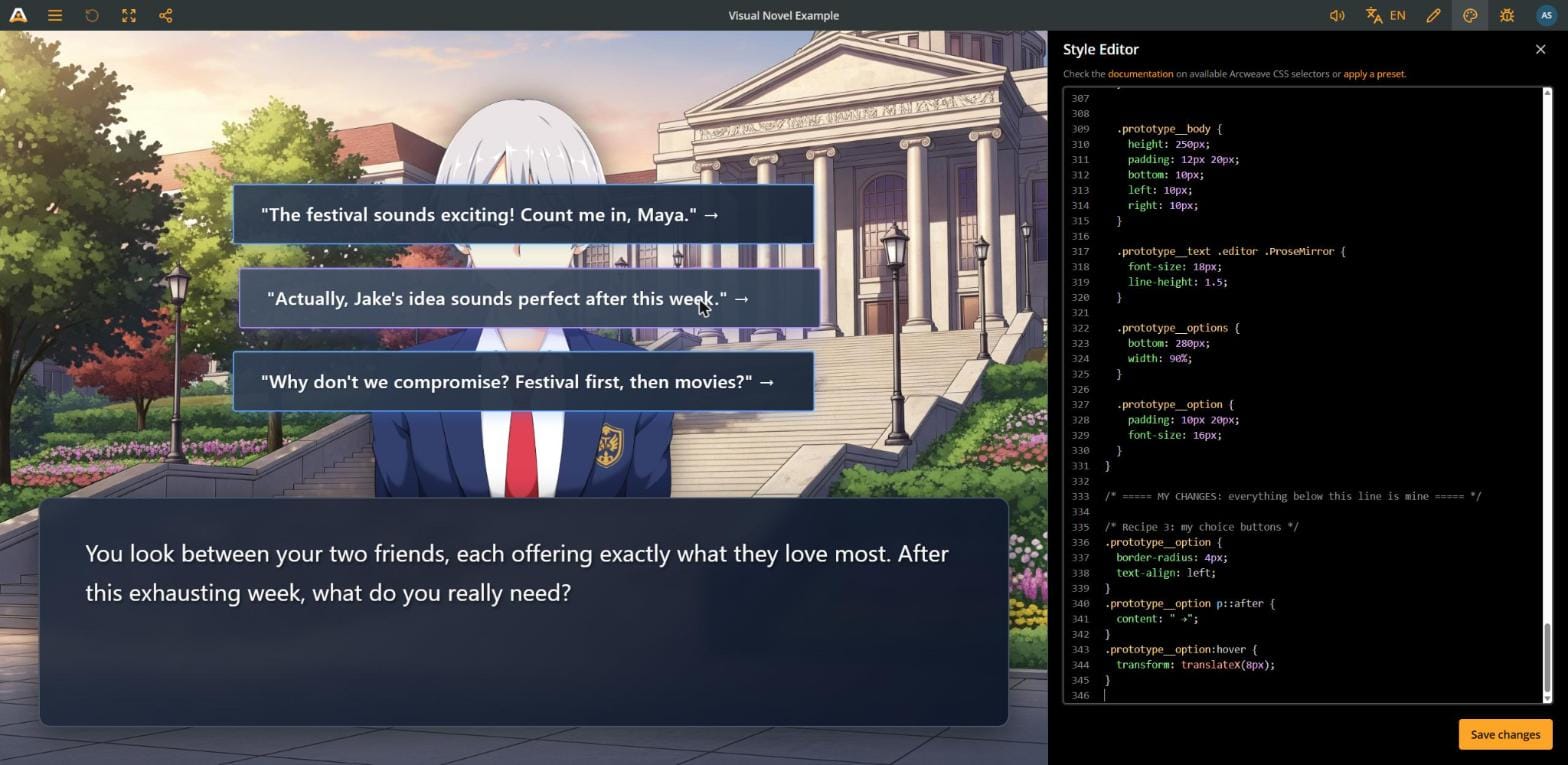
Make it yours: border-radius is the roundness of the corners: 0 is sharp, 50px is a pill. Change " →" to any symbol (" ✦", " »") or delete that block.
⚠️ The template already uses .prototype__option::before for the shine on hover. That's why the arrow goes on p::after, inside the button's text.
Recipes 4 and 5: options that tell the player something
Two features already in Arcweave turn your option buttons into signals: connection colors and visited options.
Recipe 4: Color-coded options
You get: a risky option that looks risky, a calm option that looks calm.
On your board, every connection can have a color. In Play Mode, that color name is added to its option button, so you can style it (CSS basics: connection colors). In the Visual Novel Example, the scene where you choose between the festival and the movies already uses purple, orange and blue.
- On the board, right-click a connection and pick a color from the menu.
- Decide what each color means in your story, for example: orange = risky, purple = romance, blue = calm.
- Paste this at the bottom:
/* Recipe 4: options that match their connection color */
.prototype__option.orange {
  --vn-option-border: #f97316;
  --vn-option-bg: #4a2410;
}
.prototype__option.orange p::after {
  content: " ⚠";
}
.prototype__option.purple {
  --vn-option-border: #c084fc;
}
.prototype__option.blue {
  --vn-option-border: #38bdf8;
}
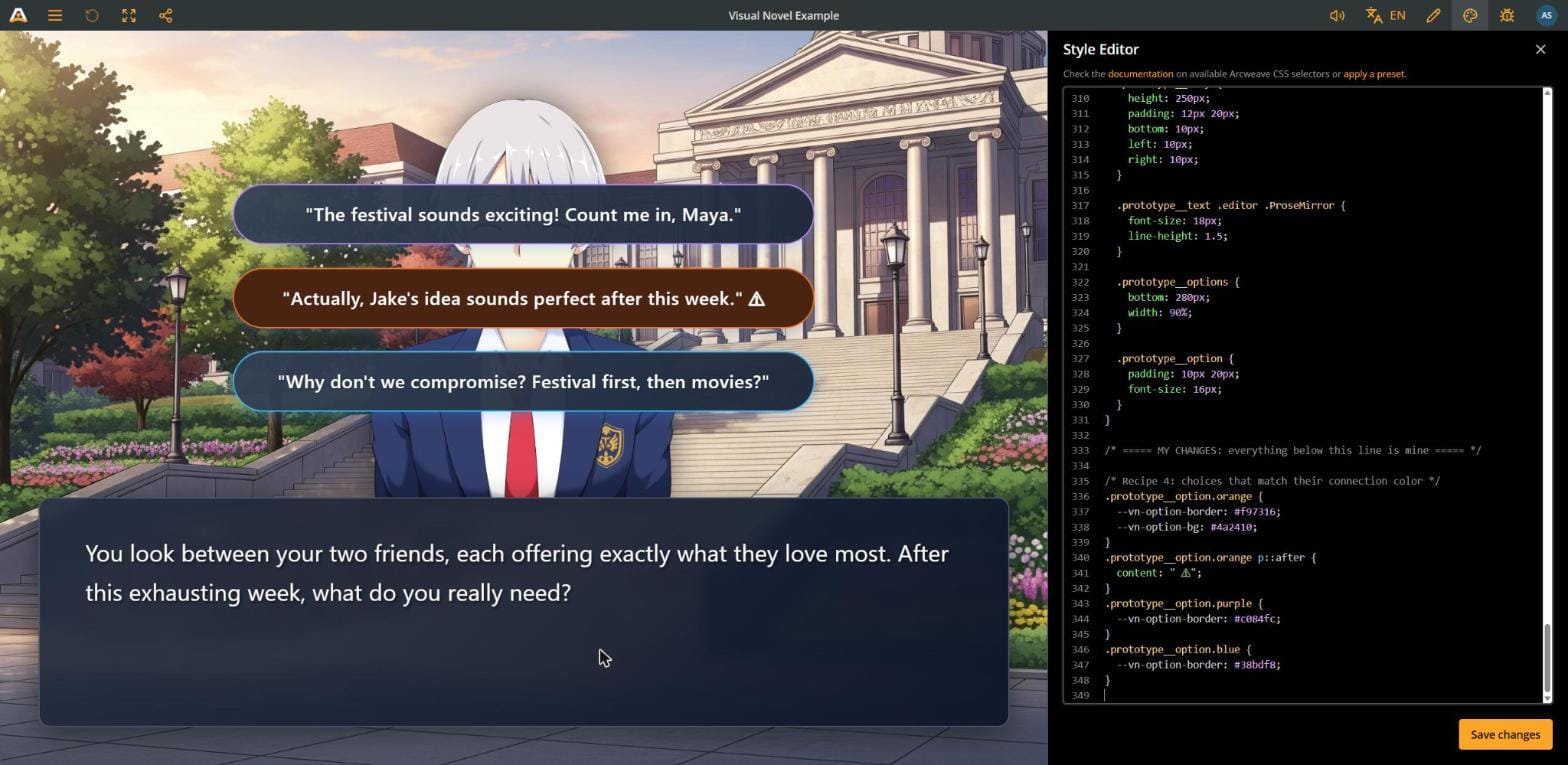
Make it yours: the color names you can use are pink, red, purple, lightBlue, cyan, moss, green, gold, brown, orange, blue and default. Write them exactly like that: lightBlue has a capital B.
💡 Some players can't tell colors apart. Pair a color with a symbol, like the ⚠ above, so the meaning never depends on color alone.
✅ The same colors show on the board, so writers and designers see the meaning of a choice while they build, not only in the game.
Recipe 5: Dim the options already taken
You get: in a menu the player comes back to (questions to ask, places to search), the options they already tried fade and get a check mark.
Arcweave adds the visited class to an option when it leads to an element the player has already seen (CSS basics: visited options).
/* Recipe 5: visited options */
.prototype__option.visited {
  opacity: 0.55;
}
.prototype__option.visited p::after {
  content: " ✓";
}
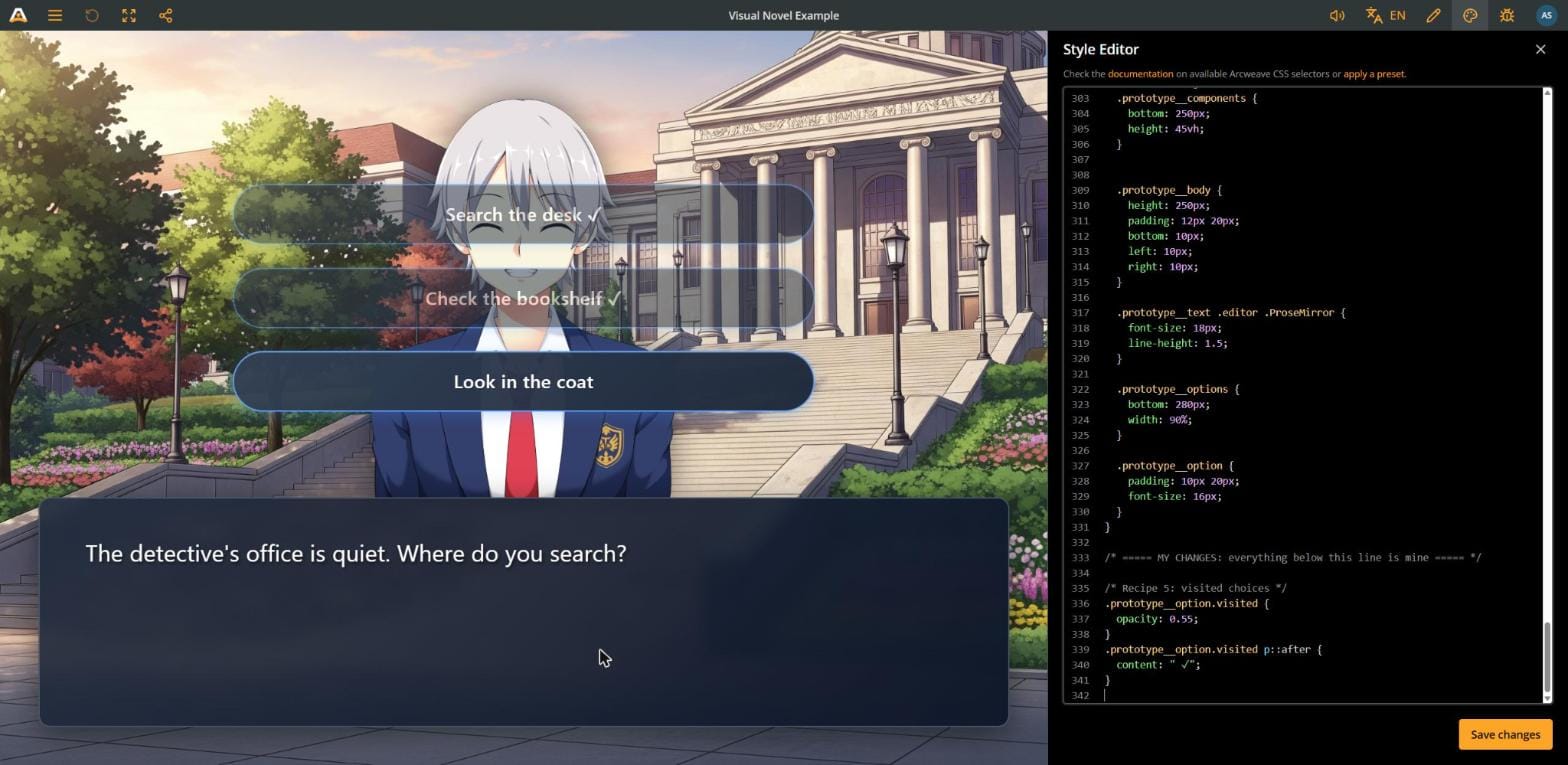
Make it yours: a lower opacity fades more (0 is invisible, 1 is normal). Don't go below 0.5, or the text gets hard to read.
Recipe 6: Style parts of a sentence
You get: names, thoughts, clues and letters that each look different, inside the same block of text.
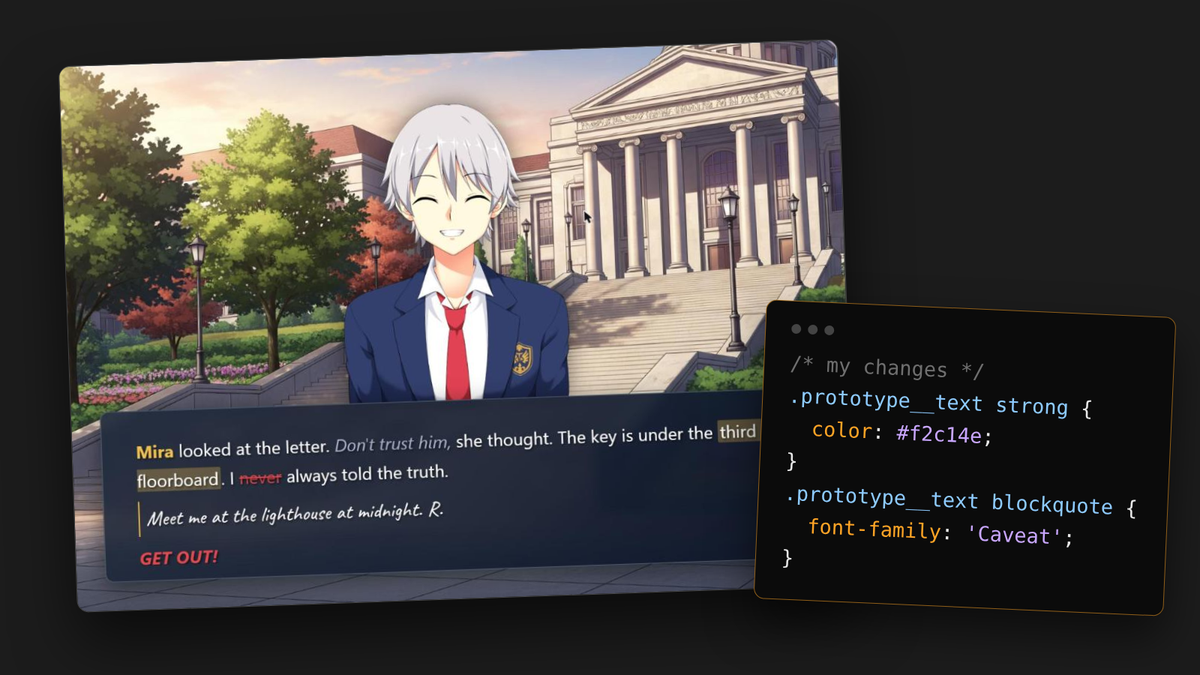
You can't pick a color for a single word in Arcweave's text editor. But each button of the formatting menu becomes an HTML tag in Play Mode, and CSS can restyle each tag. How to create a visual novel style in Arcweave's Play Mode introduced the idea with italic, bold and underline. Here we use all six formats, and give every format a job in your story:
| Format | How to apply it | Tag in CSS | Example job |
|---|---|---|---|
| Bold | B in the formatting menu, or type **text** |
strong |
Character names |
| Italic | I in the menu, or type *text* |
em |
Thoughts and whispers |
| Underline | U in the menu | u |
Clues and key items |
| Strikethrough | S in the menu, or type ~~text~~ |
s |
Words the narrator takes back |
| Blockquote | Type > and a space at the start of a paragraph |
blockquote |
Letters, notes, signs |
| Bold + italic | Both buttons on the same words | strong em |
Shouting |
Add the @import line for Caveat on line 1 (see Recipe 2), then paste this at the bottom:
/* Recipe 6: a job for each format (@import Caveat on line 1) */
.prototype__text .editor .ProseMirror strong {
  color: #f2c14e;
}
.prototype__text .editor .ProseMirror em {
  color: #a8b3cf;
}
.prototype__text .editor .ProseMirror u {
  text-decoration: none;
  background: rgba(242, 193, 78, 0.3);
  padding: 0 4px;
  border-radius: 3px;
}
.prototype__text .editor .ProseMirror s {
  color: #e5484d;
}
.prototype__text .editor .ProseMirror blockquote {
  font-family: 'Caveat', cursive;
  font-size: 1.2em;
  border-left: 3px solid #f2c14e;
  margin: 8px 0;
  padding: 0 12px;
}
.prototype__text .editor .ProseMirror strong em,
.prototype__text .editor .ProseMirror em strong {
  text-transform: uppercase;
  color: #e5484d;
}
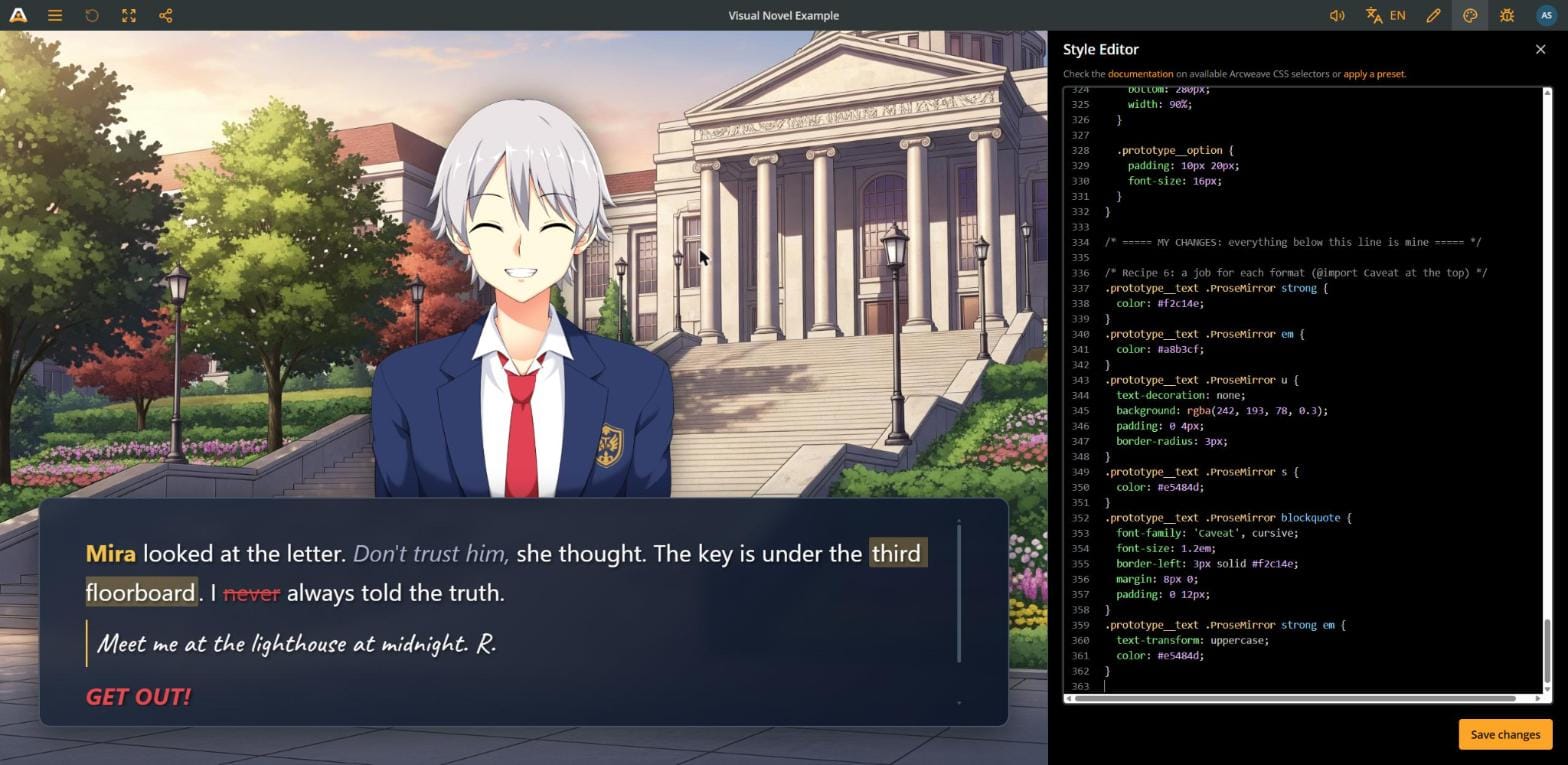
Make it yours: you don't need all six. Pick the ones your story needs, and delete the others.
💡 Agree on the jobs with your team before you write, and pin them in your team chat. If one writer uses bold for names and another for emphasis, the style breaks.
🔍 These rules apply to the whole story. To style the words of one element only, put its ID in front, as in Recipe 7.
Recipe 7: One scene, a different look
You get: a flashback in sepia, a dream, an ending screen. One element looks different from all the others.
Every element has its own ID. Put it in front of a selector, and the style applies to that element only. The method is explained in How to customize your Arcweave game using CSS.
Copy the element ID
Use either of these:
- In Play Mode: play until you reach the element, open the Debugger, and click the ID button in the Element row (not the Board row), then click the copy button next to the element’s UUID.
- On the board: right-click the element, choose Properties, open the Details tab and click the copy button next to Element ID.
Write the selector
Type #el-, then paste the ID right after it, with no space. It looks like this: #el-5d00bdb7-a34f-49e5-ad42-a7373f72f7f0. A long selector can go on two lines, like below.
/* Recipe 7: a flashback scene */
#el-PASTE-YOUR-ID-HERE {
  --vn-dialogue-bg: #3b2f22;
  --vn-dialogue-border: #a07a4a;
}
#el-PASTE-YOUR-ID-HERE
  .prototype__media img.single {
  filter: sepia(0.8);
}
#el-PASTE-YOUR-ID-HERE
  .prototype__components {
  display: none;
}
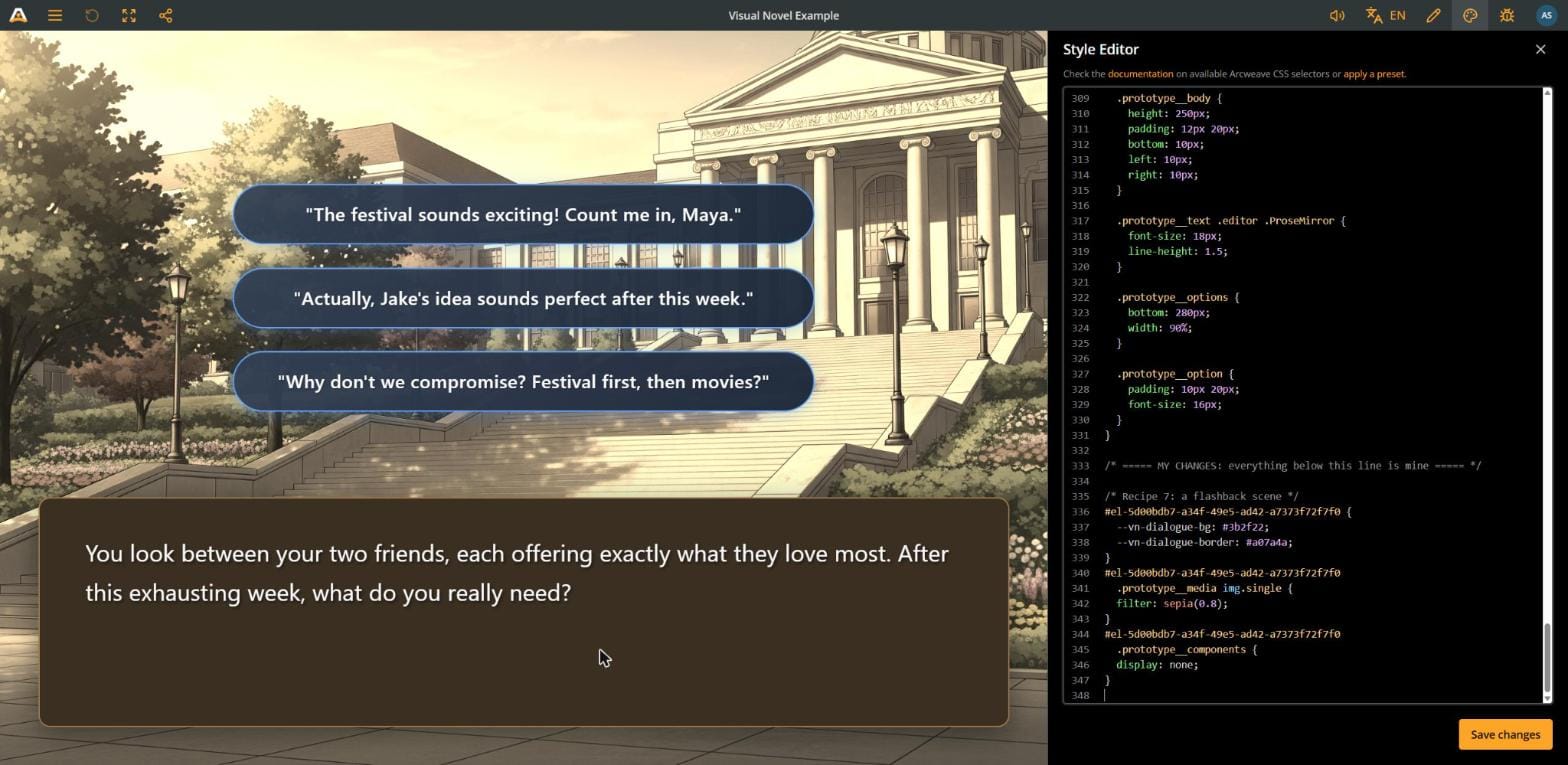
The first block changes the palette from Recipe 1 for this scene only. The second turns the background (the element cover) to sepia. The third hides the characters (the attached components).
Make it yours: swap the filter for another mood. grayscale(1) gives black and white, blur(4px) a dream, brightness(0.4) a dark room, hue-rotate(180deg) something wrong with the world.
Same look for several scenes: list the IDs with commas: #el-FIRST-ID, #el-SECOND-ID { ... }.
⚠️ Don't write #el-el-.... If you copied the ID from somewhere that already starts with el-, don't add it twice.
Three mood packs to copy and paste
Short on time? Each pack combines Recipes 1 to 3 into one look. Use one instead of those recipes, or as a starting point to tweak.
Each pack has two parts: the @import line goes on line 1 of the CSS, the rest goes at the bottom. Then save.
Polishing a game jam entry against the clock? See where styling fits in your schedule in our post Arcjam 2026 tips: how to plan, write, test, and submit your entry in time.
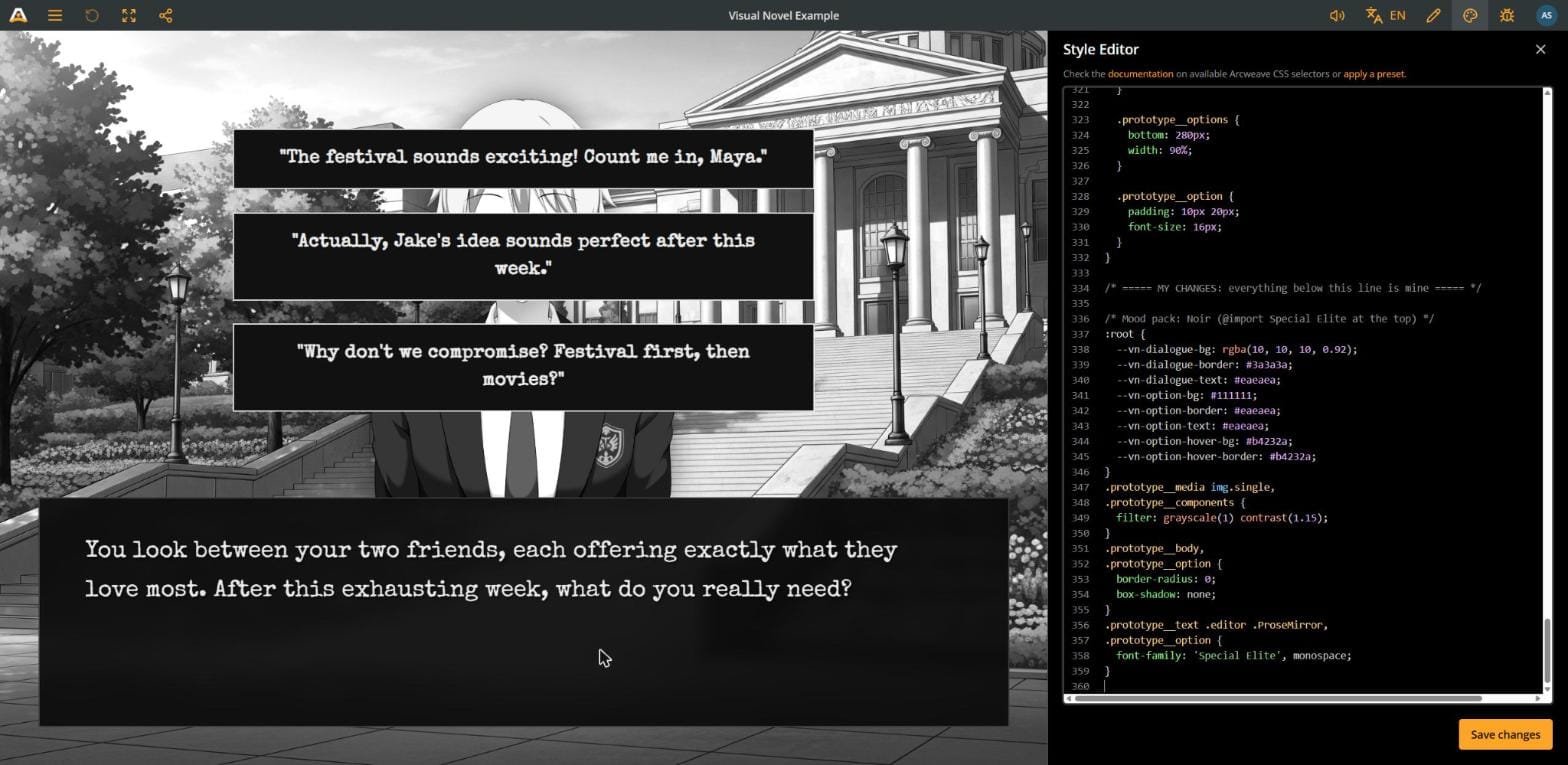
Noir
Typewriter text, black and white scenes, one red accent.
@import url('https://fonts.googleapis.com/css2?family=Special+Elite&display=swap');
/* Mood pack: Noir (@import Special Elite on line 1) */
:root {
  --vn-dialogue-bg: rgba(10, 10, 10, 0.92);
  --vn-dialogue-border: #3a3a3a;
  --vn-dialogue-text: #eaeaea;
  --vn-option-bg: #111111;
  --vn-option-border: #eaeaea;
  --vn-option-text: #eaeaea;
  --vn-option-hover-bg: #b4232a;
  --vn-option-hover-border: #b4232a;
}
.prototype__media img.single,
.prototype__components {
  filter: grayscale(1) contrast(1.15);
}
.prototype__body,
.prototype__option {
  border-radius: 0;
  box-shadow: none;
}
.prototype__text .editor .ProseMirror,
.prototype__option {
  font-family: 'Special Elite', monospace;
}
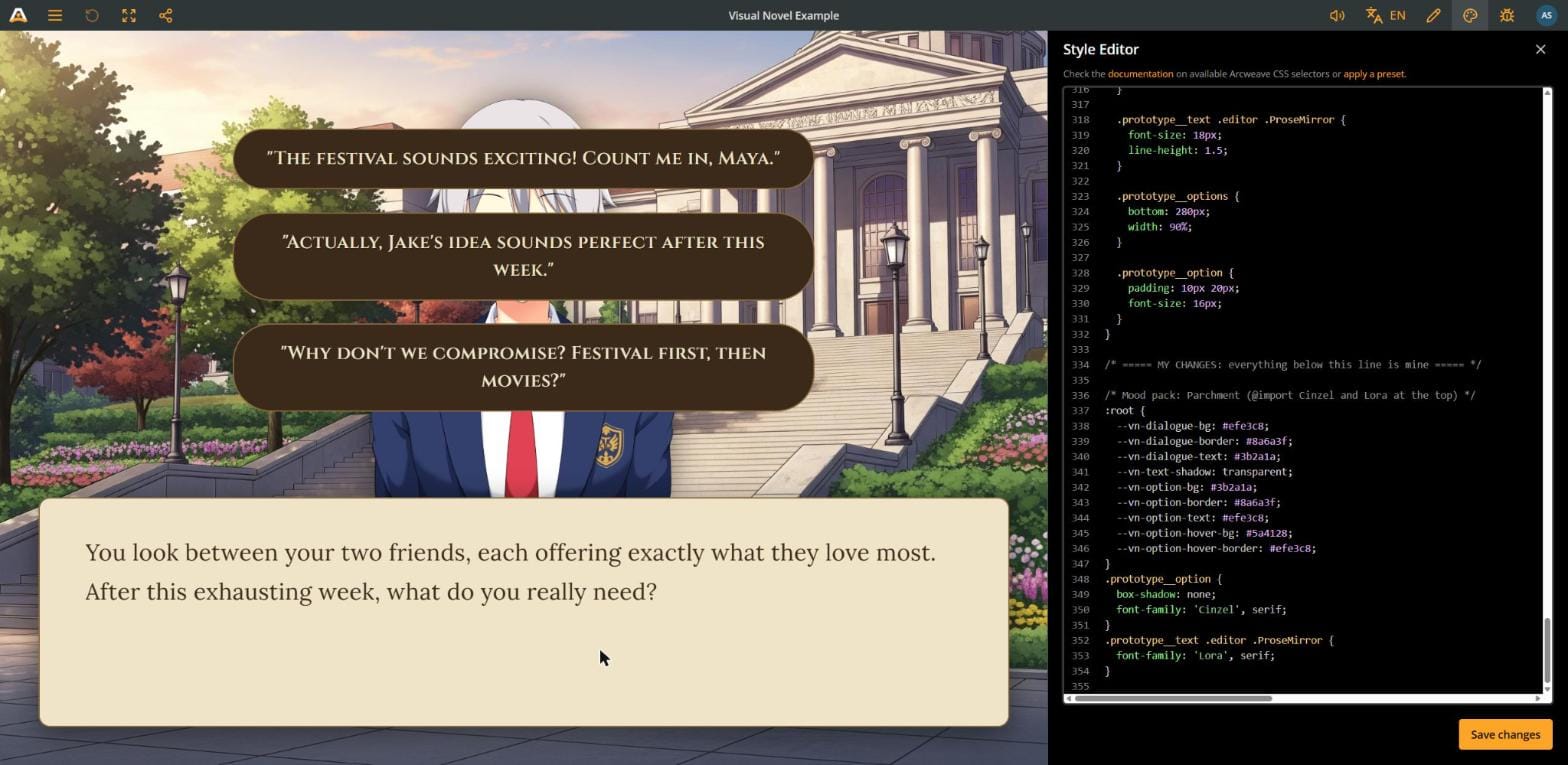
Parchment
A fantasy page: warm paper, ink-brown text, carved titles.
@import url('https://fonts.googleapis.com/css2?family=Cinzel:wght@600&family=Lora&display=swap');
/* Mood pack: Parchment (@import Cinzel and Lora on line 1) */
:root {
  --vn-dialogue-bg: #efe3c8;
  --vn-dialogue-border: #8a6a3f;
  --vn-dialogue-text: #3b2a1a;
  --vn-text-shadow: transparent;
  --vn-option-bg: #3b2a1a;
  --vn-option-border: #8a6a3f;
  --vn-option-text: #efe3c8;
  --vn-option-hover-bg: #5a4128;
  --vn-option-hover-border: #efe3c8;
}
.prototype__option {
  box-shadow: none;
  font-family: 'Cinzel', serif;
}
.prototype__text .editor .ProseMirror {
  font-family: 'Lora', serif;
}
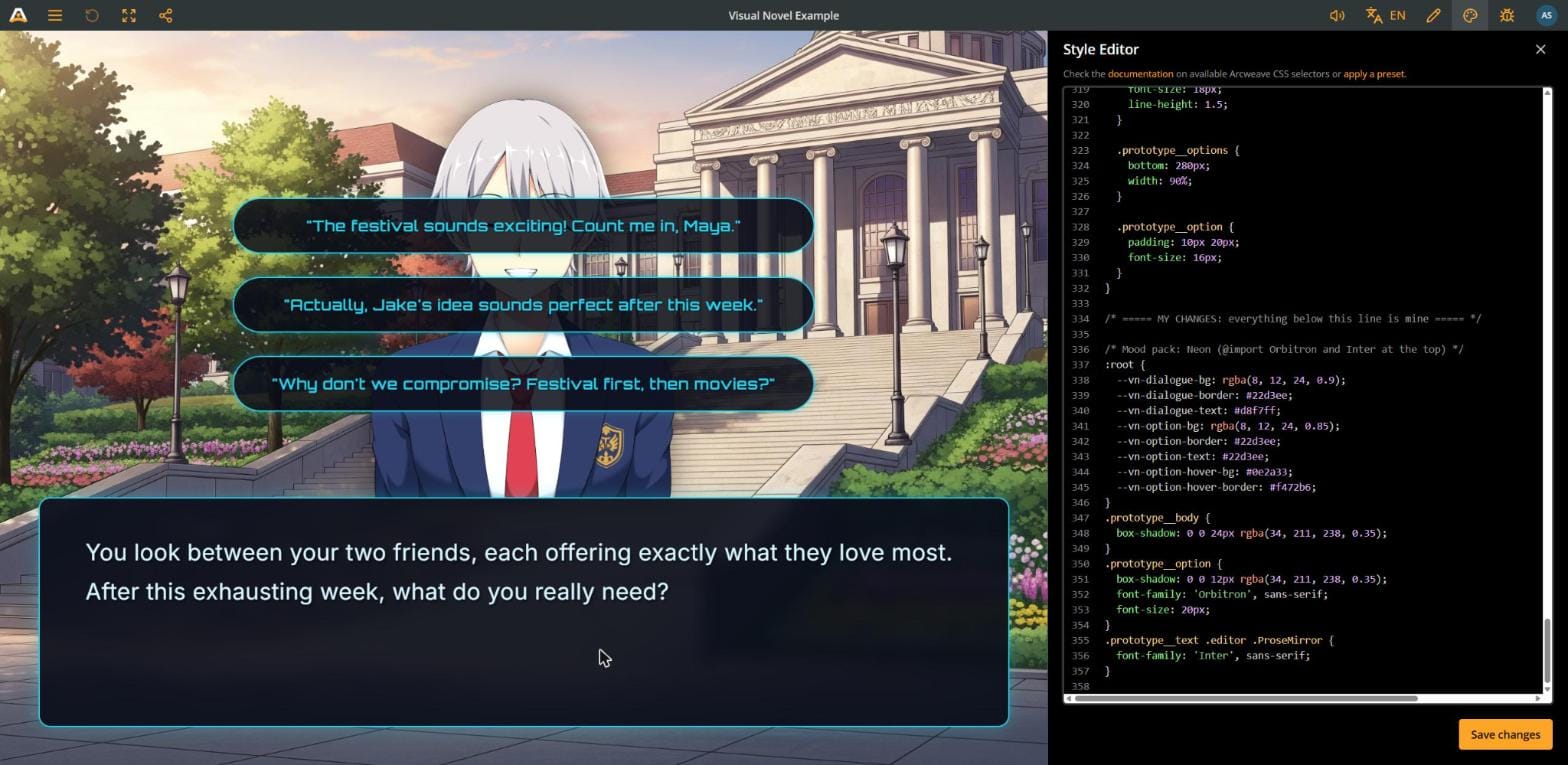
Neon
A sci-fi terminal: dark glass, glowing cyan, a pink accent on hover.
@import url('https://fonts.googleapis.com/css2?family=Orbitron:wght@600&family=Inter&display=swap');
/* Mood pack: Neon (@import Orbitron and Inter on line 1) */
:root {
  --vn-dialogue-bg: rgba(8, 12, 24, 0.9);
  --vn-dialogue-border: #22d3ee;
  --vn-dialogue-text: #d8f7ff;
  --vn-option-bg: rgba(8, 12, 24, 0.85);
  --vn-option-border: #22d3ee;
  --vn-option-text: #22d3ee;
  --vn-option-hover-bg: #0e2a33;
  --vn-option-hover-border: #f472b6;
}
.prototype__body {
  box-shadow: 0 0 24px rgba(34, 211, 238, 0.35);
}
.prototype__option {
  box-shadow: 0 0 12px rgba(34, 211, 238, 0.35);
  font-family: 'Orbitron', sans-serif;
  font-size: 20px;
}
.prototype__text .editor .ProseMirror {
  font-family: 'Inter', sans-serif;
}
✅ A pack plus Recipes 4 to 7 works well. Paste the recipes after the pack.
Test before you share
A style that looks great on one short scene can break on a long one. Spend five minutes on this list before you share your game.
- Long text: open an element with 8 or more lines. The dialogue box should scroll, not cut the text.
- Many options: open a scene with 5 options. All of them should fit and stay readable.
- One unlabelled connection: Play Mode shows a small arrow instead of a button (advance arrow). Check it's still visible on your colors.
- Colored and visited options: if you used Recipes 4 and 5, play a path that shows them.
- Phone and small windows: make your browser window narrow, then short and wide. The template's mobile rules are explained in How to create a visual novel style in Arcweave's Play Mode.
- Inside an embed: if you embed Play Mode on itch.io or your own site, the layout follows the embed's size. Check the page preview at the size you set.
- What players see: after saving, reload the Play Mode tab. Restarting the story isn't enough to load the new CSS.
Troubleshooting
| What you see | Why | Fix |
|---|---|---|
| Save changes is disabled | There's a syntax error in the CSS | Click the error count at the bottom of the panel. Look for a missing } or ; |
| Nothing changes | The rule is above MY CHANGES, or the selector is shorter than the recipe's | Move it to the bottom and copy the selector exactly |
| Nothing changes, and your project doesn't use the template | The recipes need the template's CSS | Follow How to customize your Arcweave game using CSS instead |
| The font doesn't load | The @import line isn't the very first thing in the CSS |
Move it to line 1, with nothing before it, not even a / |
| A one-scene style changes every scene | The #el- part is missing |
Add #el- and the ID at the start of each selector |
| A one-scene style changes nothing | #el-el-, or you copied the Board ID |
Copy the ID from the Element row of the Debugger |
| Teammates don't see your style | Not saved, or their tab is old | Save, then reload Play Mode |
| Parts of Arcweave outside the story look odd | A rule like body or button with no Arcweave name |
Start every selector with .prototype__, :root or #el- |
| Everything is broken | It happens | Delete everything below MY CHANGES, or paste back your backup |
Show us your remix
Share your remix with us on the Arcweave Discord: we can't wait to see games that don't look like anyone else's.
And if you're stuck on a recipe, reach out on Discord; we're happy to help.
More Arcweave resources
- How to customize your Arcweave game using CSS: every part of Play Mode, starting from its default look
- How to create a visual novel style in Arcweave's Play Mode: the visual novel layout, built from scratch
- CSS basics and Visual novel CSS tutorials in the docs
- Style Editor and Styling reference: the full list of what you can style
- Debugger, Connections and Rich text: the features the recipes use